Strawberry Rhubarb Pie

I ate Strawberry Rhubarb Pie for the first time at my cousin’s Confirmation lunch when I was eight or nine. I didn’t know what it was, but I had three servings and only stopped my gluttonous endeavor because the tart rhubarb started to make my mouth hurt. For years after, I ordered it any time I spotted it on a dessert menu.

fullsizeoutput_1151

Fresh rhubarb can generally only be found in the spring, and I’ve missed my window of opportunity the past few years. But lo and behold, the bright red stalks caught my eye at Fairway this week and I grabbed them like they were the last drops of morning dew in The Land Before Time (for those of you who don’t get that *v cool* 90’s movie reference, I snatched the rhubarb quickly and without hesitation).

This recipe is adapted from Epicurious.

fullsizeoutput_114b

INGREDIENTS:

2 Pillsbury pie crusts, thawed according to package instructions

1 pound rhubarb, chopped into 1/2 inch slices

1 16-ounce container strawberries, hulled, halved (about 3 1/2 cups)

1/2 cup packed brown sugar

1/2 cup sugar

1/4 cup cornstarch

1 teaspoon ground cinnamon

1/4 teaspoon salt

1 tablespoon unsalted butter, cut into small pieces (to dot)

1 large egg yolk beaten and blended with 1 teaspoon water (for glaze)

1 tablespoon turbinado or granulated sugar (to sprinkle on top)

fullsizeoutput_1152

DIRECTIONS:

Preheat oven to 400 degrees.

Press one pie crust into the bottom of a 9 inch pie pan. In a large bowl, combine the fruit, sugars, cornstarch, cinnamon, and sugar. Pour into prepared pie crust. Dot with butter.

You can either place the full second pie crust on top, crimp the edges, and cut slits for ventilation, OR cut the second pie crust into strips and create a lattice work top.

Once the second crust is on, brush it with the egg-water glaze. Sprinkle the turbinado (or 1 tbsp of granulated) sugar over the top.

Bake for 20 minutes, then reduce the temperature to 350 degrees and baked for an additional 1 hour and 15 minutes*. The filling should be thick and the crust golden when you remove it.

*I have a powerful oven, so you may need to keep it in for another 5-10 minutes.

Let cool on a rack then enjoy with vanilla ice cream!

fullsizeoutput_1150

Jumbo Sugar Cookie

As much as I love baking, sometimes I’m not in the mood to go through all the setting up and cleaning up involved. That’s why this recipe, courtesy of Sally’s Baking Addiction, caught my eye– it just makes one huge sugar cookie. Meaning, it’s a much smaller project than making a full batch. It requires lower ingredient measures and therefore, smaller baking tools can be used.  I LOVE when a recipe only needs 1 or 2 small mixing bowls and teaspoon/tablespoon measures. Small bowls can be popped in the dishwasher and more of them can simultaneously fit on drying mats. Aka, quicker and easier cleanup. Oh, and did I mention the best part? If you only make one giant cookie you don’t have to worry about cookie vultures*; if there’s only one cookie, they know who it’s for.

*A cookie vulture is a person or animal that circles the kitchen while you’re baking and snags a cookie before it’s even hit the cooling rack. When I’m not the one baking, I am one hundred percent a cookie vulture.

This is the first time I’ve made a small batch version of a classic, and part of the reason I chose this recipe to be my first is that it still calls for an oven. I keep seeing recipes for single serving microwave brownies and microwave cakes, but there’s something about *baking* by *microwave* that feels wrong to me. Would it taste the same? Maybe. Would I think it tasted the same? Most likely not.

fullsizeoutput_1126

INGREDIENTS:

2 Tablespoons unsalted butter at room temperature

3 Tablespoons sugar

2 Tablespoons beaten egg (crack the egg, beat it, and use 2 tbsp)

1/2 teaspoon vanilla extract

6 Tablespoons flour

1/4 teaspoon baking soda

1/4 teaspoon salt

1/4 teaspoon cream of tartar

2 Tablespoons sprinkles — the more colorful, the better!

fullsizeoutput_1122

DIRECTIONS:

Preheat oven to 350 degrees. Either spray a baking sheet with non-stick spray or cover it with a piece of parchment paper.

In a small bowl, cream the butter and sugar. Stir in the 2 Tbsp of egg and the vanilla extract.

Add the remaining ingredients and mix until just combined. Be careful not to overdo it!

fullsizeoutput_1123

Flip the cookie dough out of the bowl and onto the baking sheet so that it looks like a tall ball (if it’s too flat it will be way too thin!). Bake for approximately 15 minutes until the edges are lightly browned. I took mine out at 13 minutes because I wanted an ooey gooey center, but that’s your call! Just remember that it will continue baking for a few minutes after you take it out of the oven, so don’t overcook it.

Allow the cookie to cool completely on the cookie sheet– no cooling rack needed here.

fullsizeoutput_1124


Sprinkles Vanilla Cupcakes

I remember the first time I heard of the California based cupcake bakery, Sprinkles. I was watching acclaimed reality show “The Girls Next Door”, the fairytale saga of Hugh Hefner and his collection of girlfriends. Bridget, his number 2 GF, was throwing a birthday party and brought in Sprinkles cupcakes for the occasion. “Doesn’t everyone order cake for a birthday? What’s the big deal?”, you ask confusedly. Well when you have your own kitchen staff like the Playboy mansion, you don’t have ANYTHING brought in unless it’s really spectacular.

IMG_3199

Several years later when I was interning at “E! News” in LA, I finally laid my paws on one during an event at the office. Little did I know that by then, a Sprinkles had opened in my home state of New York. It was everything I dreamed of: moist and delicate, with dense, creamy frosting. So when I found a recipe online, of course I wanted to try it. The recipe I found is for their peppermint cupcakes, so I adjusted it slightly to be plain vanilla, and to make 24 cupcakes rather than 12. I also used this fondant recipe to make the heart garnishes. Yes, I know they make the cupcakes look vaguely boob-like, for better or worse.

IMG_3145

Servings: Makes 24 cupakes

INGREDIENTS:

For the cupcakes:

3 cups all-purpose flour , sifted

2 tsp. baking powder

1/2 tsp. coarse salt

1 cup whole milk , room temperature

4 tsp. pure vanilla extract

1 cup (2 sticks) unsalted butter , room temperature

2 cups sugar

2 large eggs, room temperature*

4 large egg whites, room temperature*

*If your eggs are warming too slowly, gently place them in a cup, then fill the cup with lukewarm (not hot) water until they reach room temperature

For the frosting:

2 cups (4 sticks) unsalted butter , firm but not cold

1/4 tsp. salt

7 cups confectioners’ sugar , sifted

2 tsp. vanilla extract

1 tsp. milk


DIRECTIONS:

For the cupcakes:

Preheat oven to 350°. Make sure the racks are in the lower two thirds of the oven. Line 2 cupcake tins with liners.

In a medium bowl, whisk together flour, baking powder and salt; set aside.

In a small bowl, mix together milk and extracts; set aside.

In the bowl of an electric mixer fitted with the paddle attachment, cream butter on medium-high speed, until light and fluffy. Gradually add sugar and continue to beat until well combined and fluffy. Reduce the mixer speed to medium and slowly add egg and egg whites until just combined.

With the mixer on low, slowly add half the flour mixture; mix until just blended. Add the milk mixture; mix until just blended. Slowly add remaining flour mixture, scraping down sides of the bowl with a spatula until just blended.

Divide batter evenly among prepared cupcake liners. Gently shake the tins so that any raised batter flattens. Transfer muffin tin to oven and bake until tops are just dry to the touch, 22 to 25 minutes– I know this is a super scary way to test them as opposed to the toothpick method, but they’ll keep cooking in the pan so take them out as soon as you can touch the top without getting any residue on your finger. Rotate tins once while baking. Transfer tins to a wire rack and let cupcakes cool completely in tin before icing.

IMG_3124

For the frosting:

In the bowl of an electric mixer fitted with the paddle attachment, beat the butter and salt on medium speed until light and fluffy, about 2 minutes.

Reduce the speed to low, gradually add the confectioners’ sugar and beat until incorporated. Add the extracts and milk and beat until smooth and creamy. Do not overmix or the frosting will incorporate too much air; it should be creamy and dense, like ice cream. Add additional milk, 1 teaspoon at a time, if frosting does not have a spreadable consistency.

IMG_3164

To assemble:

While gingerly holding a completely cooled cupcake, scoop a large amount (thing about a half a tennis ball) onto the top of the cupcake using a spatula. Then, swipe the sides of the cupcake in a circular motion until the top looks flat and the sides are smooth, almost like a volcano. Place any decorations on top, then eat!

These can be stored in an airtight container in the refrigerator for about 3-4 days.

IMG_3182


Classic Chocolate Cake

During my elementary school years, I could always count on coming home to a snack and a glass of milk in the afternoon. We had a snack drawer, which evolved into a healthier snack drawer over time, then eventually ceased to exist as we got older and more in tune with nutrition. But back in the snack drawer’s glory days, we also kept one Entenmann’s treat on the counter at all times. At the dawn of our family snack habit it was the yellow cake with chocolate frosting, or the full blown chocolate cake with chocolate frosting. That gradually morphed into chocolate cake with marshmallow frosting because we wanted to *shake things up*.

IMG_2907

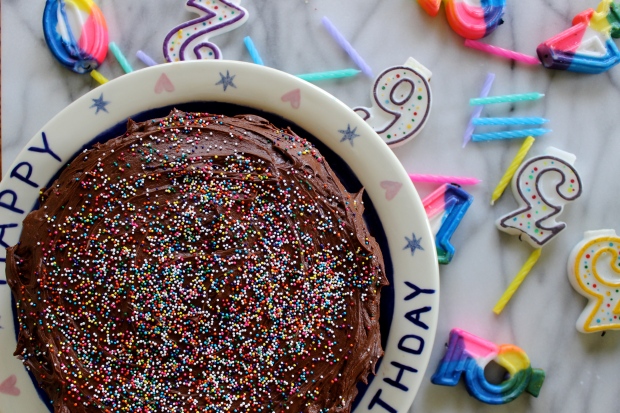
Beautiful, silky frosting

The other day I had a craving for chocolate on chocolate cake with a cold glass of milk. Truth be told, I’ve just been craving milk in general and I think making a cake seemed like the perfect excuse to drink more of it without causing any suspicion. Conveniently, a few days before my mom’s birthday, she asked me to make her cake. “What kind”, I responded, silently hoping that she would tell me to pick. Which she did. Chocolate on chocolate it was.

I found this recipe on a blog called Add a Pinch. I adjusted it slightly; I used instant coffee powder instead of espresso powder, so I diminished the amount in the frosting. If you like your chocolate frosting to err on the side of mocha, feel free to add a touch more.

INGREDIENTS:

For the cake:

2 cups all-purpose flour

2 cups sugar

¾ cup unsweetened cocoa powder (I used Hershey’s)

2 teaspoons baking powder

1½ teaspoons baking soda

1 teaspoon salt

1 teaspoon instant coffee powder

1 cup whole milk

½ cup vegetable or canola oil

2 eggs

2 teaspoons vanilla extract

1 cup boiling water

For the frosting:

1½ cups butter (3 sticks), softened

1 cup unsweetened cocoa

5 cups confectioner’s sugar

½ cup whole milk

2 teaspoons vanilla extract

1/4 teaspoon instant coffee powder

DIRECTIONS:

For the cake:

Preheat oven to 350º F. Prepare two 9-inch cake pans by spraying with baking spray.

Add flour, sugar, cocoa, baking powder, baking soda, salt and instant coffee powder to a large bowl. Whisk through to combine.

IMG_2868

Add milk, vegetable oil, eggs, and vanilla to flour mixture and mix together on medium speed with an electric mixer until well combined. Reduce speed and carefully add boiling water to the cake batter. Beat on high speed for about 1 minute to add air to the batter.

Distribute cake batter evenly between the two prepared cake pans. Bake for 30-35 minutes, until a toothpick or cake tester inserted in the center comes out clean.

Remove from the oven and allow to cool for about 10 minutes, remove from the pan and cool completely.

Slice off any uneven tops if you wish. Normally I do, but with this cake the domed top can give it a nice homemade charm.

For the frosting:

Add cocoa to a large bowl or bowl of stand mixer. Whisk through to remove any lumps.

Cream together butter and cocoa powder until well-combined.

IMG_2884

Cute baby sticks of butta.

Add sugar and milk to cocoa mixture by adding 1 cup of sugar followed by about a tablespoon of milk. After each addition has been combined, turn mixer onto a high speed for about a minute. Repeat until all sugar and milk have been added.

Add vanilla extract and espresso powder and combine well.

If frosting appears too dry, add more milk, a tablespoon at a time until it reaches the right consistency. If it appears to wet and does not hold its form, add more confectioner’s sugar, a tablespoon at a time until it reaches the right consistency.

IMG_2920

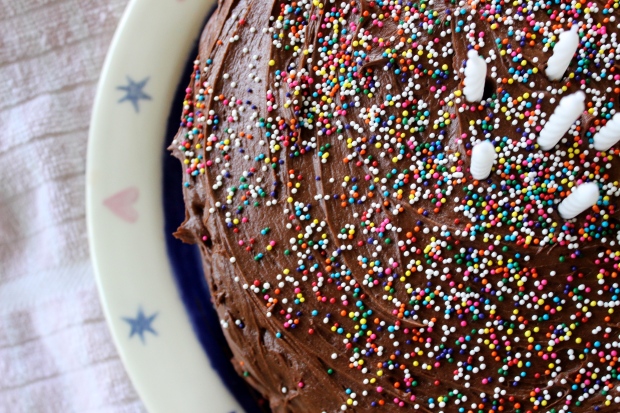
I love how the rainbow sprinkles pop against the milk chocolate!

Assembly:

Frost the cake. Throw some sprinkles on there. Stand back, admire. Eat. Maybe one more slice.

IMG_2912

There’s nothing like decade-old birthday candles

IMG_2926

Imagine that with a cold glass of milk… yes, please.


Joy the Baker’s Confetti Cookies

Every once in a while, I stop by Joy the Baker’s site to see what she’s been up to. And by “once in a while”, I mean at least once a week. For those of you who aren’t familiar with Joy, she is the epitome of what it means to be an enjoyable food blogger: witty, knowledgeable, and direct. When I found myself on her site this week, two recipes gave me pause. Strawberry rhubarb pie, and these vanilla bean confetti cookies. I’ve ogled both before but had yet to make either.

Initially I chose to make the strawberry rhubarb pie, but it’s still so cold outside that I wasn’t sure that my Fairway would have rhubarb yet. It’s also so cold outside that I did not, in fact, want to go outside. I had all the ingredients for the confetti cookies, so confetti cookies it was. And I am VERY content with my choice. They’re playfully colorful and so soft that eating them is probably the closest one could come to safely consuming a tube of raw cookie dough. I said safely. They also have a depth of flavor that other sugar/butter cookies don’t have, due to the vanilla bean and their chilling time.

The one warning I must give before you embark on your confetti cookie journey is that the dough needs to be refrigerated prior to baking. SO. If there isn’t a lot of time before you want these cookies to meet your face, I would pick a different recipe. Or at the very least find something to distract yourself for two hours while they chill.

IMG_2780

INGREDIENTS:

1 1/2 cups all-purpose flour

1 teaspoon baking powder

1 teaspoon cream of tartar.. all of mine is from the 80’s and has expired.. shh.. don’t tell

1/2 teaspoon baking soda

1/2 teaspoon salt

1/2 cup (1 stick) unsalted butter, at room temperature

3/4 cup granulated sugar

Seeds from 1 vanilla bean

1 large egg

1 teaspoon pure vanilla extract

1/2 cup sprinkles, more if you want to throw them in the air joyfully while you bake

IMG_2827

DIRECTIONS:

In a medium bowl whisk together flour, baking powder, cream of tartar, baking soda, and salt.

In the bowl of an electric mixer fitted with a paddle attachment, beat the butter and sugar at medium speed until light and fluffy, about 3 to 4 minutes. Add the vanilla bean seeds, then the egg and vanilla extract, and beat until thoroughly combined.

With the mixer on low add the dry ingredients into the wet ingredients in a few doses. The dough will become quite thick– don’t worry, this is correct. Fold in 1/4 cup of the sprinkles.

Place the remaining 1/4 cup sprinkles in a bowl. Scoop up 2 tablespoons of dough and roll into a ball– I was using about 1/4 of dough at first, so I quickly ran out of dough. Gently roll the ball in the bowl of sprinkles to cover lightly. Put the balls on a plate. Repeat with the remaining sprinkles and dough. Chill the soon-to-be cookies for at least 2 hours in the refrigerator.

IMG_2836

Place racks in the center and upper third of the oven and preheat the oven to 350 degrees F. Line 2 baking sheets with parchment paper.

Transfer the chilled dough balls to the prepared baking sheets, leaving about 2 inches of space in between each ball.

Bake until the cookies have spread very slightly and are just beginning to brown around the edges, but are mostly pale and pillowy, 8 to 10 minutes.* Let cool on the cookie sheets for 5 minutes before transferring to wire racks to cool completely, then transfer to your  mouth ASAP.

*I took mine out a bit before they browned on the edges, since I like my cookies to be very soft and chewy. If you want more of a crisp exterior and a soft interior, stick with Joy’s directives.


IMG_2860

Et voila!

Lemon Chia Seed Muffins

Last summer my best friend Lauren invited me out to her family’s house in the Hamptons. I’ve lived on Long Island for 23 years and yet somehow, this was my first opportunity to visit the infamous area. I didn’t want to show up empty handed, so I made these lemon chia seed muffins. The original recipe calls for poppy seeds, but I only had chia seeds on hand, and I actually prefer them now. I also substituted plain greek yogurt for the buttermilk, since I found that it made for moister muffins. Because of these additions, I think the muffins qualify as healthy. That’s why I ate not one, but two, for breakfast at work this morning.

IMG_2615

One of the best traits of any muffin is its portability factor; I like a breakfast that can be zipped in a bag and taken with me, no muss, no fuss. That’s why I eat candy for breakfast so often. Very portable.

IMG_2626

INGREDIENTS:

1/2 cup (1 stick) unsalted butter, softened

2/3 cup granulated sugar

2 large eggs, SEPARATED. SEPARATED!

1 1/3 cups flour

1 tsp baking powder

1/2 tsp baking soda

2 tbsp chia seeds (these can be found at Trader Joe’s in a resealable bag)

1/4 tsp salt

1/2 cup plain greek yogurt (about 1 single serving plastic cup)

2 tbsp freshly squeezed lemon juice (about half of a juicy lemon)

1 tsp vanilla extract

The zest of 2 lemons
IMG_2602

IMG_2607

DIRECTIONS:

Preheat oven to 350°F. Coat a muffin tin with nonstick cooking spray (this recipe makes about 12 muffins).

In a large bowl, cream the butter and sugar until fluffy.

Add the egg yolks, one at a time, beating well with an electric mixer after each.

In a separate bowl, stir together the dry ingredients, chia seeds, and lemon zest.

With the mixer on low speed, add the dry ingredients to the creamed mixture, alternating two times with the greek yogurt, then lemon juice, and then vanilla.

Beat just until smooth.

In another bowl, beat the egg whites until soft peaks form.

Gently fold them into the muffin batter until blended.

Spoon the batter into the prepared pan, 3/4-full.

Bake at 350°F for 20-25 minutes or until a toothpick inserted in the center comes out clean.

Cool for 5 minutes before removing to cool completely.

IMG_2626


Cranberry Pumpkin Muffins

It’s not even the end of September and I’m already plotting which Halloween decorations will go where. Halloween isn’t even my favorite holiday- it just signifies the beginning of the holiday season, and perhaps more importantly, loads of candy. Since I’m diving right into fall with my decorating, I figured I might as well jump right on the pumpkin recipe bandwagon.

IMG_1801

IMG_1841

Since it’s still relatively warm out, I didn’t want to make anything that has to be served hot, so muffins seemed like a good choice. I found this recipe on VeryBestBaking.com. It’s wonderfully simple; I just tweaked it to include vanilla and dried cranberries, as well as a streusel-inspired topping. I love grabbing a soft, crumbly muffin on my way out the door in the morning, or even eating one for dessert with some cool whip. They’re also great for taking in the car if you have to drive somewhere and need an easily accessible, hands free snack (i.e. NOT sushi, which I had to eat while rolling through Times Square while working at New York Fashion Week).

IMG_1814

INGREDIENTS:

2 cups  all-purpose flour

2/3 cup  packed brown sugar, plus 1/4 cup for sprinkling

1/3 cup  granulated sugar

1 tablespoon  baking powder

1 teaspoon  salt

1 teaspoon  ground cinnamon

1 tsp vanilla extract

1/4 teaspoon  baking soda

1/4 teaspoon  ground ginger

1/2 cup  butter, melted

1/2 cup canned pumpkin

2 large  eggs, lightly beaten

1/3 cup  buttermilk

1 cup dried cranberries

1-2 tbsp cold butter, cut into small pieces

IMG_1773

IMG_1798

DIRECTIONS:

Preheat oven to 400° F. Grease or paper-line 12 muffin cups.

IMG_1781

Combine flour, brown sugar, granulated sugar, baking powder, salt, cinnamon, baking soda and ginger in large bowl. Combine butter, pumpkin, eggs, vanilla, and buttermilk in medium bowl. Add to flour mixture, stir just until moistened. Gently fold in cranberries. Spoon into prepared muffin cups, filling 3/4 full. Sprinkle with the remaining 1/4 cup brown sugar, and dot with the cut up butter.

IMG_1784

IMG_1794

Bake for 15 to 20 minutes or until wooden pick inserted in center comes out clean. Cool in pan on wire rack for 5 minutes; remove to wire rack to cool completely. I always take my muffins/cupcakes out of the oven a minute or two before they’re fully cooked, since they finish baking in the tin.

IMG_1804

Enjoy!

Leslie

Blueberry Zucchini Bread

As summer winds down I’m trying to make recipes with produce that is only available during the hot, sweaty months. If you can’t tell, summer is my least favorite season. I can’t stand the sweltering humidity that feels like a wet sweater clinging to my arms every time I go outside, or the fact that I sweat every time I walk thirty feet- it sort of throws a wrench in looking presentable.

IMG_1635

But back to the benefits of summer: I really like zucchini bread as an alternative to banana bread, which is a bit denser. Zucchini is super versatile being that it’s very water based and, in spite of its vegetable food grouping, is quite sweet. Therefore, it can be used in dessert and main course dishes alike. Zucchini bread in particular is great because you can eat it for breakfast or with a plop of whipped cream for dessert. And, since it’s technically veggie based, you can pretend you’re being healthy by grabbing seconds.

IMG_1595

This recipe comes from my old standby, Allrecipes.com.

INGREDIENTS:

3 eggs, lightly beaten

1 cup vegetable oil

3 tsp vanilla extract

2 1/4 cups white sugar

2 cups shredded zucchini

3 cups all purpose flour

1 tsp salt

1 tsp baking powder

1/4 tsp baking soda

1 tbsp ground cinnamon

1 pint fresh bloobs (blueberries)

IMG_1616

IMG_1609

IMG_1630

DIRECTIONS:

Preheat oven to 350 degrees F. Lightly grease 4 mini-loaf pans. I used 4 super mini pans, so I had extra batter to make mini muffins with. If you make mini muffins, only bake them for 15 minutes.

In a large bowl, beat together the eggs, oil, vanilla, and sugar. Fold in the zucchini. Beat in the flour, salt, baking powder, baking soda, and cinnamon. Gently fold in the blueberries. Transfer to the prepared mini-loaf pans.

IMG_1601

Bake 45-50 minutes in the preheated oven, or until a knife inserted in the center of a loaf comes out clean. Cool 20 minutes in pans, then turn out onto wire racks to cool completely.

IMG_1634

Enjoy!

Leslie

Baked Occasions Strawberry Cake

I’m always trepidatious when it comes to trying desserts with fruit in them. Fruit-bearing desserts almost always have way too much fruit, and way too little butter and cake and brownies and chocolate. For example, “berries and whipped cream” are almost always a bunch of blackberries and strawberries with a tiny dollop of whipped cream; I’m not in dessert for the fruit, I’m in it for the dessert.

In spite of my clearly defined feelings toward fruit masquerading as dessert, this Strawberry Supreme Cake, as it’s called in the cookbook Baked Occasions, caught my eye. I kept flipping back to the photo of the elegantly whimsical cake, on which three strawberries were neatly perched. The cake to berry ratio seemed to be in my favor. I skimmed the recipe and though it calls for multiple cups of fresh or frozen strawberries, it also calls for butter, heavy cream, and sugar, so my fruit fears were abated. (I want to reiterate, it’s not that I don’t like fruit, it’s just that it has it’s place, and that’s usually not on my dessert plate, or in salads… generally speaking, I find fruit in salads to be a bit wonky).

IMG_9959

IMG_9969

This cake is probably the best homemade strawberry cake you’ll ever make. It’s fluffy and moist, thanks to the shortening and meringue in the batter. The frosting, which contains three sticks of butter, is fluffy and enchanting in texture. The strawberry preserves, which lie under the whipped cream filling, round out the cake perfectly. To be honest, I doubted whether I could finish my slice since it’s so, so sweet, but somehow I managed.

IMG_9945

IMG_9981

Due to copyright laws I can’t reprint the wonderful recipe here, but hopefully the pictures will inspire you to buy the book, or try a strawberry cake recipe of your own!

IMG_9910

 Enjoy!

Valentine’s Day Red Velvet Cake

Valentine’s Day is one of my favorite holidays, and not for the reasons you might think. Yes, if you have a significant other, it’s about celebrating your “relationship” (i.e. it’s actually about overdone Hallmark cards, overpriced roses, and last minute restaurant reservations made by frantic boyfriends and husbands… I know, because I take said reservations). For me, Valentine’s Day has always been about celebrating all forms of love in my life. Every year, my mom has given me and my sister a few small goodies on the morning of Valentine’s Day. Last V-Day I was living in California, and she sent me an awesome package: Dove chocolate, cherry/vanilla tootsie rolls, the movie “It’s Complicated”, themed socks, and decorations.

Screen Shot 2015-02-13 at 11.01.52 AM

^The package from my mom.^

Growing up, we also had an annual Valentine’s Day tea party for friends. We stopped doing it at some point, but, inspired by Leslie Knope’s Galentine’s Day festivities, I decided to revive it. Instead of doing a tea party, though, we’re going to be having dinner, cocktails, and cake. And thanks to my friend Lauren, buff chick and heart shaped mozzarella stick appetizers. HEYOOO. Buff chick for the win.

IMG_9857

At the afore mentioned Valentine’s Day tea parties, my mom always made a heart shaped cake. Usually vanilla, and usually with those little red heart gummies that you find at CVS perched on top. As an homage to that cake, I made a red velvet heart shaped cake with cream cheese frosting. I generally think that red velvet cake is slightly overrated, as compared to say, peanut butter and chocolate cake, but it was the most festive option. If you have a heart shaped tin (mine is from Wilton), you can use the following cake recipe and it will fit perfectly. I used Alton Brown’s cream cheese frosting recipe, but feel free to use your favorite. Whatever recipe you choose, I recommend sifting the powdered sugar before adding it to your wet ingredients, or you’ll have lumpy frosting.

IMG_9863

Original Cake Recipe: http://cooking.nytimes.com/recipes/1016329-red-velvet-cake

INGREDIENTS:

½ cup unsalted butter at room temperature

2 tbsp cocoa powder

1 ½ cups sugar

2 large eggs

2 teaspoons vanilla

pink/red food coloring

1 teaspoon salt

1 teaspoon baking soda

2 ½ flour, sifted

1 cup buttermilk

1 tablespoon white vinegar

IMG_9837

DIRECTIONS:

Heat oven to 350 degrees. Prepare heart shaped cake pan by greasing heavily with butter or crisco, then coat with a thin layer of flour or cocoa powder, tapping out excess.

Cream butter and sugar together. Add eggs one at a time and beat vigorously until each is incorporated. Mix in vanilla.

Add food coloring and cocoa powder. If you’re using pink food dye, add more than you think you need in order to make a deeper red color.

Sift together remaining dry ingredients. Alternating in 2 batches each, add dry ingredients and buttermilk to the butter mixture. In the last batch of buttermilk, mix in the vinegar before adding to the batter. Mix until blended.

IMG_9800

Pour batter into cake pan. Cook for about 25 minutes, or until a toothpick inserted into the center of the cake comes out clean.

IMG_9809

Let cool, invert onto wire rack, then frost as desired.

IMG_9845

Enjoy!

Leslie